
The product(s) featured in this review was provided free of cost to me for the sole purpose of product testing and review. This review has not been monetarily compensated. Please note that any personal opinions reflected in this post are my own and have not been influenced by the sponsor in any way.
Some of the posts on this site may contain an affiliate link, which means I may get paid a small commission (and I do mean SMALL) if you purchase the product or service.
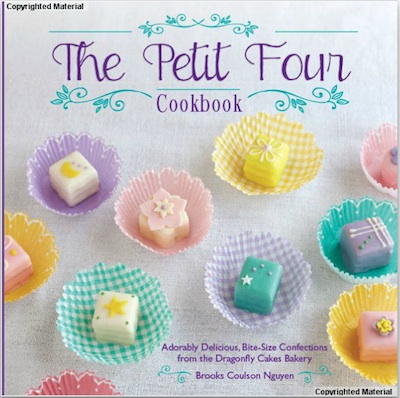
The Petit Four Cookbook: Adorably Delicious, Bite-Size Confections from the Dragonfly Cakes Bakery

- Hardcover: 128 pages
- Publisher: Ulysses Press (November 19, 2013)
- Language: English
- ISBN-10: 161243228X
- ISBN-13: 978-1612432281
- Cover price $19.95
ABOUT THE PETIT FOUR COOKBOOK
Surprise your party guests with stunning and delicious French treats–Petits Fours!
Introducing “The Petit Four Cookbook,” a step-by-step guide to creating the bite-sized cake treats for every occasion (weddings, baby showers, garden parties, Valentine’s Day, etc.).
A classic French treat often paired with tea, petits fours are delicate layers of moist cake, buttercream and marzipan, coated in decadent chocolate.
With easy-to-follow recipes and mouth-watering photos, “The Petit Four Cookbook” teaches you how to make these adorably delicious treats in exciting flavors, including Chocolate, Lemon, Gingerbread, Orange, Raspberry and more.
“The Petit Four Cookbook” is written by Brooks Nguyen, owner of the popular Dragonfly Cakes Bakery (Sausalito, CA) and who is widely regarded as the American queen of petits fours.
MY THOUGHTS
Chapters include:
- All-Occasions
- Gift Box
- Elegant
- Baby Shower
- Easter
- Children’s Party
- Tea Time
- Garden Party
- Wedding
- Valentine’s Day
- Fruit Basket
- Halloween
- Winter Holiday
The recipes are extremely detailed and take up several pages. The recipe takes you through each step of making a petit four. For each petit four in the book there are a couple of recipes you will have to make. For instance, the All-Occasion petit four recipe below calls for nine recipes – vanilla sponge cake, vanilla soaking syrup, simple syrup, vanilla buttercream, custard, marzipan, almond paste, white dipping chocolate and white decorating chocolate. At the beginning of each recipe there’s a mini index of where in the cookbook you will find the required recipes. The recipes have a color photo at the beginning showing you what the end result will look like. Prep and cooking time can’t really be included in these recipes, as the author recommends planning ahead and making them at least a day ahead. I can understand that now that I’ve gone through the cookbook and know how much work goes into making one. I had no idea! It isn’t that it’s technically difficult, it’s just that there are a lot of steps. This cookbook would be perfect for anyone who is patient and really enjoys baking detailed items, entertaining and making an impression.
Here’s the recipe for All-Occasion Petit Fours, courtesy of the author and publisher.
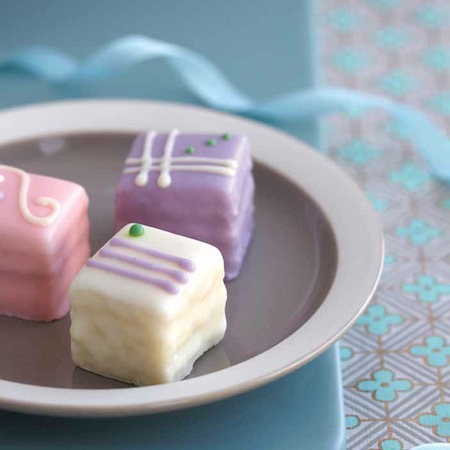
These elegant and classic petits fours can be used for any occasion. They are perfect for a wedding shower, baby shower, or tea party, yet simple enough to also accompany an afternoon card game. Or, let them be the star of an evening affair. This design will elevate any event.
All-Occasion Petit Fours Recipe
Pages 25-29, Reprinted courtesy of the author and publisher
Vanilla Petits Fours
- Vanilla Sponge Cake
- Vanilla Soaking Syrup
- Vanilla Buttercream
- Marzipan
- White, Pink, and Lavender Dipping Chocolate
- White, Green, and Lavender Decorating Chocolate
Vanilla Sponge Cake (Dragonfly Cakes’ signature recipe)
Yield: 3 thin sheets of 9 x 13-inch cake, about 24 petits fours
- butter, for greasing the sheet pans
- 9 large egg whites
- 1 cup granulated sugar
- 8 large egg yolks
- 31⁄4 cups cake flour
- 2 teaspoons baking powder
- 1⁄2 teaspoon salt
- 3⁄4 cup vegetable oil
- 1 cup water
- 1 teaspoon vanilla extract
1. Preheat the oven to 400°F. Grease three 9 x 13-inch sheet pans and line with parchment paper. Then grease the parchment paper.
2. In the bowl of a stand mixer fitted with the whip attachment, combine the egg whites and sugar. Whip on high speed until light and fluffy, about 2 to 3 minutes. Transfer the egg whites to a separate bowl.
3. Without cleaning the bowl or the wire whip, beat the egg yolks on high speed until light yellow and creamy, about 5 minutes.
4. In a medium bowl, sift together the flour, baking powder, and salt. Stir to combine. Using a spatula, gently fold the egg whites into the egg yolks until no streaks of white remain. Then gently fold in the dry ingredients. Slowly add the oil and water, and fold gently to combine. Add the vanilla last and fold to combine.
5. Divide the mixture among the sheet pans and spread it thin. Bake until golden brown, approximately 10 to 12 minutes. Let cool completely. Store in the refrigerator up to 1 week, wrapped in plastic wrap.
Vanilla Soaking Syrup
Yield: 3⁄4 cup
- 3⁄4 cup Simple Syrup (pasted below)
- 3⁄4 teaspoons vanilla extract
1. In a small bowl, stir together the simple syrup and vanilla to combine.
2. Store in an airtight container in the refrigerator for up to 1 month.
Simple Syrup
Yield: 4 cups
- 4 cups water
- 4 cups granulated sugar
1. In a large, heavy pot, bring the water to a boil over high heat.
2. Stir in the sugar and reduce the heat to medium-high, continuing to stir until the sugar is dissolved and the liquid is clear, about 4 minutes.
3. Remove from the heat and let cool. Transfer the cooled simple syrup to an airtight container or glass jar and store in the refrigerator for up to 1 month.
Vanilla Buttercream
Yield: 2½ cups
- 1 pound (4 sticks) unsalted butter, at room temperature
- 1 2⁄3 cups Custard (pasted below)
- 1⁄4 teaspoon vanilla extract
1. In the bowl of a stand mixer fitted with the whip attachment, whip the butter on high speed until light and fluffy, about 3 minutes. With machine running, add the custard and vanilla. Beat until the mixture increases in volume, about 4 minutes.
2. Store the buttercream in the refrigerator for up to 2 weeks in an airtight container. If stored in the refrigerator, warm to room temperature before whipping again in the stand mixer on high speed for 2 to 5 minutes, until light and fluffy. If it isn’t at room temperature, the buttercream will be very watery.
Custard (Dragonfly Cakes’ signature recipe)
Yield: 6 cups
- 1⁄4 cup cornstarch
- 1 1⁄2 plus 1⁄3 cups granulated sugar, divided
- 4 cups whole milk
1. In a medium heatproof bowl, combine the cornstarch and 1⁄3 cup of the sugar, stirring to combine.
2. In a medium, heavy pot, add the remaining 11⁄2 cups sugar and the milk. Stir to combine, and bring to a gentle simmer over medium-high heat. When gentle bubbles form in milk mixture, use a heatproof measuring cup to transfer 1⁄2 cup of the warm milk into the cornstarch mixture. Using a whisk, combine the cornstarch and milk until smooth.
3. Continue heating the milk mixture, stirring occasionally, until it comes to a boil. (Watch carefully, so the milk doesn’t boil over.) When the milk comes to a boil, whisk in the cornstarch mixture to combine.
4. Keep the pot over medium-high heat, continue to whisk, and cook until the custard is thick, about 5 minutes.
5. When the custard has thickened, remove from the heat. Pour the custard onto a rimmed half-sheet pan and let cool. Transfer to a container, and refrigerate. Use to make buttercream within 1 or 2 days before custard begins to get watery.
Marzipan
Yield: 2 cups
- 1 cup confectioners’ sugar
- 1 cup Almond Paste (pasted below)
- 3 teaspoons egg white
- 1 tablespoon corn syrup, plus more if needed
1. In the bowl of a stand mixer fitted with a paddle attachment, mix the sugar and almond paste on medium speed for 3 minutes, until the almond paste has broken up and resembles dry sand.
2. Decrease the speed to low, add the egg white, and continue to mix for 10 seconds. Add the corn syrup, mixing until a dough forms, about 3 minutes. If the mixture continues to be crumbly, add 2 teaspoons more corn syrup for the dough to adhere.
3. Transfer the marzipan to an airtight container and store in the refrigerator for up to 2 weeks.
Almond Paste
Yield: 3½ cups
- 11⁄2 cups blanched almonds (slivered or whole)
- 11⁄2 cups confectioners’ sugar
- 3⁄4 cup Simple Syrup, or as needed
1. In the bowl of a food processor, grind the almonds until they become a smooth, fine powder, about 1 minute.
2. Add the confectioners’ sugar into the food processor, and purée the mixture until it is the texture of cornmeal, about 1 minute.
3. With the food processor running, pour the simple syrup through the feeder tube into the almond mixture, adding only enough simple syrup to turn the mixture into a paste.
4. Transfer the almond paste to a container, and store in the refrigerator for up to 1 month.
White Dipping Chocolate
Yield: 2 cups
- 16 ounces white coating chocolate
- 1 to 2 tablespoons vegetable oil
Tip: Use oil-based candy color to create different colors:
Pink Dipping Chocolate: Add 1 drop pink
Yellow Dipping Chocolate: Add 1 drop yellow
Orange Dipping Chocolate: Add 1 drop orange
Lavender Dipping Chocolate: Add 1 drop lavender
Green Dipping Chocolate: Add 1 drop green
Blue Dipping Chocolate: Add 2 drops blue
1. Add water to the bottom of a double boiler. Over medium-heat, bring the water to a low simmer. (The water should not reach the top part of the double boiler.) Add the coating chocolate into the top of the double boiler. Stir the chocolate until melted. Make sure to heat it just to the point of melting; if heated too long, it will burn and solidify.
2. Add 1 tablespoon oil, and stir until fully incorporated and there are no oily streaks on the surface. Add up to 1 more tablespoon oil as needed to be sure the chocolate is fluid but not too thin, or it won’t coat the petits fours completely.
3. Transfer the chocolate to a heatproof, microwave-safe bowl, stirring in color, if desired. Begin dipping the frozen, pre-cut petits fours. If chocolate cools and becomes difficult to work with, microwave the mixture in 10-second increments, stirring after each interval, until warmed.
4. After dipping 10 to 12 petits fours, crumbs may begin to accumulate in the chocolate. To prevent excess bumps on the dipped petits fours’ sides, warm the coating chocolate, then pour through a mesh strainer to remove excess crumbs.
White Decorating Chocolate
Yield: 1 cup
- 8 ounces white coating chocolate
- 2 teaspoons vegetable oil
Tip: Use oil-based candy color to create different colors:
Pink Decorating Chocolate: Add 1 drop pink
Yellow Decorating Chocolate: Add 1 drop yellow
Orange Decorating Chocolate: Add 1 drop orange
Lavender Decorating Chocolate: Add drop 1 lavender
Red Decorating Chocolate: Add 2 drops red
Green Decorating Chocolate: Add 1 drop green
1. Add water to the bottom of a double boiler. Over medium heat, bring the water to a low simmer. (The water should not reach to the top part of the double boiler.)
2. Add the coating chocolate into the top of the double boiler. Using a heatproof spatula, stir the chocolate until melted. Make sure to heat the chocolate just to the point of melting; if heated too long, it will burn and solidify.
3. Add the oil to the melted chocolate, continuing to stir until the oil is completely incorporated and the coating chocolate is fluid. If using, stir in desired oil-based color.
4. To pipe, use a teaspoon to transfer the chocolate to a small parchment paper cone or piping pastry bag. If using a paper cone, start by using scissors to snip a small hole at the tip, only increasing the hole size if the chocolate does not flow smoothly from the cone.
5. If the chocolate cools and becomes difficult to work with, microwave in 10-second increments in the cone, stirring between intervals, until warmed. The chocolate must be fluid (approximately 100°F, or warm to the touch) to be used for decorating.
Assemble and Decorate
1. Follow the directions (also attached) to assemble the vanilla petits fours. Using petit four cutters, make the petits fours into squares, or any other shapes you desire, like rectangles or hearts. Place the cut shapes on a sheet tray or in an airtight container and store in the freezer.
2. Line a baking sheet with parchment paper. Prepare the White Dipping Chocolate, Pink Dipping Chocolate, and Lavender Dipping Chocolate. Transfer each batch of chocolate into individual heatproof bowls for dipping, about 6 inches across and 5 inches deep. Using a kitchen fork, individually dip the petits fours into the chocolates; try to dip an even number in each color. Use one fork to dip the petits fours, marzipan side up. Tap the fork on the side of the dipping container until the excess dipping chocolate drains off. Use a second fork to push the dipped petits fours onto the parchment paper. Wait until chocolate hardens, 3 to 5 minutes. Once dry, cut the excess chocolate off of the bottom of the petits fours. Put each petit four in a small candy cup. Store in the refrigerator until ready to decorate. If you are decorating the cakes on a different day, store in an airtight container so they don’t absorb the flavors of the refrigerator.
3. Remove the petits fours from the refrigerator and place them onto a parchment paper–lined baking sheet. Prepare batches of Lavender Decorating Chocolate, White Decorating Chocolate, and Green Decorating Chocolate. Transfer the chocolate into individual piping bags or paper cones. Pipe decorations in the three colors onto the top of the petits fours, making designs like dots, swirls, and stripes. Let the petits fours set, for 3 to 5 minutes. Serve immediately or transfer the petits fours to an airtight container and refrigerate until serving.
And here are instructions for preparing to make petit fours, since multiple recipes are involved and time is needed.
Preparation And Assembly
The process of making petits fours is best if it is spread out over two days. Some items can be made in advance. Petits fours are time-consuming, but the end result will have your friends oohing and ahhing over your creations.
These tasks can be done ahead of time:
• Baking the cake
• Making the fillings
• Making the syrup
• Making the marzipan
• Making the cutout decorations
Plan ahead, and you’ll find that each step for making petits fours is not challenging on its own.
There are simply multiple steps. Here is the schedule I suggest:
Day 1:
• Cut out the decorations (can also be made weeks in advance)
• Bake the cake
• Make the custard, buttercream, and fillings (most can be made in advance)
• Fill and layer the cake
• Cover the cake in marzipan (then refrigerate for at least 3 hours; can be stored in the freezer for up to 1 month)
Day 2:
• Cut the cake into shapes.
• Coat the cakes in the chocolate coating mixture and modeling chocolate
• Add decorations
Assembly
After deciding on a flavor combination, bake the cake and make the filling. To assemble the
petits fours, follow these steps:
Cake
• Remove the dark brown cake bloom (the dark layer on top of a cake after it is baked) with a serrated bread knife.
• Slice the cake horizontally into 2 even layers with a serrated bread knife. Gently move the top layer to the side and reserve. If you are making the Vanilla Sponge Cake or the Chocolate Sponge Cake which are baked in 3 shallow pans, you can skip this step.
Filling
• Brush a thin layer of soaking syrup onto the first layer of cake with a pastry brush.
• Spread a thin layer of jam or lemon curd onto the first layer of cake, approx. 1⁄8 inch. Then spread 1⁄8 inch of buttercream on top of the jam or curd, or on top of the cake itself if no jam or curd is being used. The jam, curd, or buttercream should be thin enough that you can still see the cake through it.
• Top with the reserved cake layer.
• Spread another 1⁄8 inch of buttercream on top of the cake. The top layer of buttercream adheres the marzipan to the top of the cake.
Marzipan
• Using a rolling pin, roll out a thin layer of marzipan on a surface dusted with cornstarch. The marzipan should be 25 percent larger than your layered cake to cover the top of the entire cake (add ½ inch to each side of the marzipan when rolling out).
• Smooth the marzipan over the cake with your hand or a fondant smoother, if available.
• Refrigerate the assembled cake for at least 3 hours to let it set up. It can be stored for up to a week in the refrigerator, up to a month in the freezer.
Cut the cake
• Cut the cake into shapes, such as squares, circles, hearts, or whatever you’d like, with a chef’s knife, petit four cutters, or cookie cutters. As you decide on the shape, make sure that the cake pieces are as wide as they are tall. For example, if the cake is 11⁄2 inches high, then the shape needs to be at least 11⁄2 inches wide. If the petit four cake is taller than it is wide, it will appear as if it is tipping over. Place these cut cake pieces in the freezer on a cookie sheet, where they need a minimum of 1 hour to set, or store for up to 1 month in an airtight container. If storing for 1 day to 1 month, wrap the airtight container in plastic wrap to prevent the cake from absorbing foreign flavors.
Glazing
• Prepare the white or dark dipping chocolate (page 28 and page 92). Place this glaze into a heatproof container that is at least 5 inches deep and 6 inches wide, like a medium glass bowl. The bowl needs to be deep enough that you can dip the cake into the coating and remove it quickly without touching the sides of the bowl.
• Take the cut petits fours pieces out of the freezer. It is best to work in small batches, just 5 to 6 petits fours at a time. This will keep the cake pieces cold and the dipping chocolate warm.
Otherwise, the cake layers will separate and become hard to work with. The chocolate should be warm to the touch, about 90°F to 100°F; you can measure the temperature with a candy thermometer. If the chocolate is hot to the touch, it will melt the buttercream in between the cake layers. Cool by stirring until it is only warm to the touch.
• Line a baking sheet with parchment paper and get two kitchen forks ready. Use one fork to quickly dip one petit four at a time into the glaze, marzipan side up. Completely submerge the cake into the glaze, remove quickly, and then tap off the excess glaze. (Be careful because the warm glaze can melt the buttercream if submerged too long.) Use the second fork to gently push the petit four onto the parchment paper–lined baking sheet. Once the glaze is dry, 3 to 4 minutes, cut off the excess glaze with a knife. Place each petit four into a candy cup (a small decorative paper cup).
• Any extra dipping chocolate can be strained through a mesh strainer and used for another batch of petits fours.
Decorating
• The petits fours can be decorated with cutout decorations made from modeling chocolate. Another alternative is to finish the petits fours with decorating chocolate. Any leftover decorating chocolate should be discarded.
Storage
• Assembled, decorated petits fours can be stored in the refrigerator for up to 1 week. It is best to store them in a plastic container and then wrap the container in plastic wrap to prevent the cakes from absorbing the refrigerator’s odors.
pat.
Tuesday 26th of November 2013
So pretty but I don't ice or decorate well at all.
Cinny
Tuesday 26th of November 2013
Those look cute and amazing!
LisaLisa
Tuesday 26th of November 2013
Love these, so cute and look very easy to make. Great for this coming Holidays.
Mama to 5 BLessings
Tuesday 26th of November 2013
those are adorable! They remind me of Easter. My kids would love these, thank you!
Jenny
Tuesday 26th of November 2013
Those are so cute, and so petite. Love it!